Last night I kicked off a campaign in Low Fantasy Gaming (my favorite retroclone!) and I had a very strong start. In fact, I would say it had the best buy-in I have managed to get from my players in a very long time. I chalk a lot of it up to an adjustment to my planning method.
I returned to Old-School games because I have less time for gaming than I used to; I needed games that were faster, lighter, and more flexible than Pathfinder or Dungeons & Dragons 5e. I have according ly also been working on trying to find the best combination of tools and techniques for campaign planning.
The Narrative Bumper Pool Method
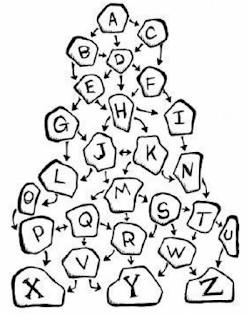 |
| Narrative Bumper Pool Diagram from XDM: Extreme Dungeon Mastery By Tracy Hickman Illustration by Howard Taylor |
This creates a Narrative Bumper Pool like the ones described in Tracy Hickman's XDM: Extreme Dungeon Mastery. The hooks and opportunities offered at the end of each adventure moves the PCs around a grid of possible events and developments towards a number of possible conclusions.
Of course, players tend to add their own branches and events to the grid. It rarely remains true to the original design.
The bumper pool system is very narrow. You need relatively little information to dive into the campaign and get the players engaged. It balances dynamism with enough constraints to keep the planning moderate. If you are at point D on the chart here, you really only need to plan clearly for E, F, or H.
The problem with the Narrative Bumper Pool method is that you need to make sure players are invested heavily enough by points B or C that they are motivated to keep moving, which means that adventures A, B, and C have to do a lot of heavy world-building and get the players emotionally involved.
And that means you need to pack a lot into them to create that buy-in. It works best if you throw the characters into a struggle for survival, or to defend kith and kin. It predicates your campaign on setting a particular sort of urgent tone.
My Tonal Dilemma
My trick with this campaign is that my players had a particular request regarding tone. They wanted a campaign that was not hinged on desperate survival, was not gritty, had a focus on wonder and exploration, and had a touch of whimsy.
This means that creating the push from A, B, and C to D, E, or F couldn't rely on the usual options of fire, death, isolation, desperation, or isolation that can throw players in the deep end. Instead, mystery and temptation were required. And while the Narrative Bumper Pool method certainly can work using those notes, it isn't the optimal method.
The Open-Matrix Sandbox Method
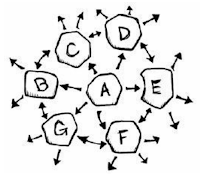 |
| Open Matrix Diagram from XDM: Extreme Dungeon Mastery By Tracy Hickman Illustration by Howard Taylor |
In this method you fill a Map with opportunities, put the characters in an goal-oriented first adventure that gives them a taste, and then you hint at what is out there on the map to see. You give the players tons (but not all) of the options, and see what they pick up on.
Hickman points out in XDM: Extreme Dungeon Mastery, the biggest flaw with this method is that the players, given too much freedom, tend to lack motivation, and can lose interest in adventuring.
I find the best tool for this us to have active threats and factional rivalries that are time-sensitive running in the background. Once the PCs are aware of something going on that is urgent, but encourages exploration they don't lack for options to motivate the PC.
In effect each of the options on the open grid diagram can lead to a Narrative bumper.
Tools like the fronts from Dungeon World, or my own Devastation Dice tool can create a great compromise of methods.
Many of these fronts or factional don't even need to be in process at first. If you set up a delicate balance of factions that could be easily pushed into conflict by the actions of the players, all the better. This is what Jacob Hurst describes as the "Powder-keg" method of campaign design, which is very well exemplified in his Hot Springs Island setting.
What I Love About Building Sandboxes
Ultimately, a sandbox requires relatively little planning. You can draw up map, then put a number of points on it that are sites that offer potential adventure. These initially don't need any more than a one-line description. Each location gives you rumors you can offer, a promise of adventure, and a mystery to hook your players.
It is fast, easy, and with the right background music as you plan, it can snowball fast.
My Current Campaign Setup
Here is how I set up my current campaign:
Basic Pitch
I started with an old idea that I have been tossing around for awhile:
The PCs arrive in a young fortified community at the edge of a vast expanse of marsh. The marsh has been shunned for centuries, as it holds the ruins of a lost civilization (Tula) that fell due to its ruling caste's (the Ushaks') abuses of dark magic; a lot of strange things happen there. Demons and faeries are said roam the deep marsh.
The marsh has recently been discovered to hold the cures for several diseases, a wealth of Alchemical goods, and excellent fishing. Now there is a rush to collect high-demand herbs, claim land, and dig new secrets out of the marsh ruins.
The Map
After that I drew up a player map of the marsh using Worldographer.
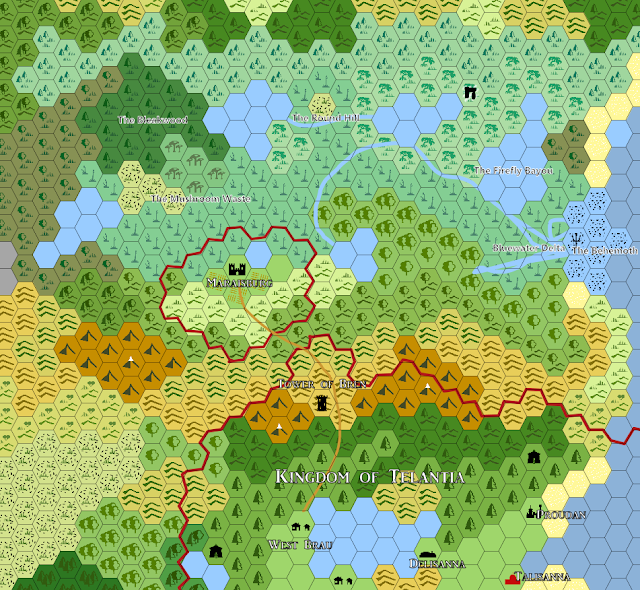 |
| Made with Worldographer, CC-BY 2021 Brian C. Rideout (6mi / hex) |
I put a few noteworthy features I had in mind here and there to start.
The Home Base
Once I had a Map, I designed the main location, Maraisburg, in point form.
- Settled by the surviving members of a high-level adventuring party.
- Been around 45 years. Only recently became a real boom town.
- The Countess is a Cleric bound by her warrant to maintain a secular fief.
- The Countess has worked for decades to build up good race relations between humans and demihuman in Telantha.
- The walls were built by dwarves that owed the adventurers a debt of honor. It is way bigger and better fortified than needed, there is still lots of room to build in the Motte.
- Relies on Telantha for many things that cannot yet be made locally, and so must be ruled under Telanthan law, but the locals resent this, and would rather be a free nation.
- A force of Rangers are needed to guard the one road back to Telantha... Bandits have nearly starved the town once already.
- The dwarves and humans living together has led to massive innovation in clockwork, alchemy, and firearms.
- There is a statue to a fallen companion of the adventurers, Rolan, in front of a guild hall for sell-swords, scouts, and guides called the Hall of Heroes.
- A Dwarf-run fruit farm and meadery, the Melon Pool is the wealthiest business.
- A local Herbalist collective and research hospital is the center of medical science in the region, and us run by Dr. Rem an Alchemist and former Adventuring companion of the countess.
- Two wizards have been drawn to town by the ruins; they have a cool rivalry.
- The dwarves and Halflings ("Aveline, damnit, we ain't half of nothin'! ") live in town.
- There is a secret elf village in the marsh. They maintain a sacred Grove embassy in the community, but are standoffish.
- The local Inn, The Cursed Sword, and brothel, The House of the Blue Roof are owned by the same man.
- Thanks to Elvish proclivities and fertility, there are nine half-elves who were born, raised, and now work in the House of the Blue Roof. It leads to rude assumptions about half-elves.
- Those half-elf courtesans control the Amber Order - a pseudo-mystical thieves' guild - in secret.
- A rival criminal organization, The Gentlemen, is attempting to take control of the town's black market.
- A race of toad-like bog-men with stone-age technology trade Medicinal herbs and fish for metal and glassware. They refuse to come closer to the town than the wharf.
Filling in the Gaps
After that, much of the job is just putting things on the map as I brainstorm them up. Here is my resultant GM map and my notes:
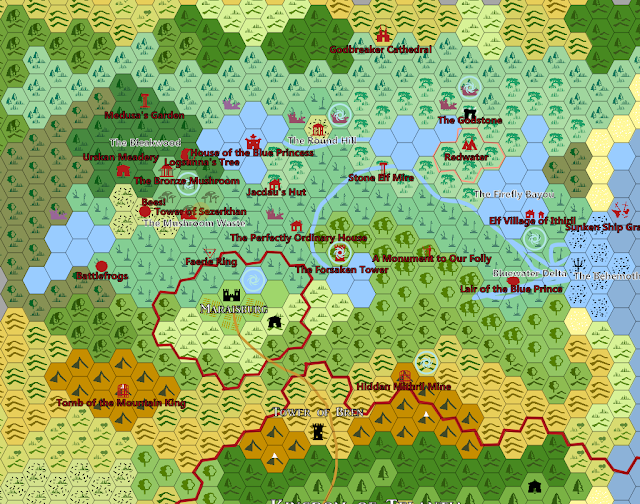 |
| Made with Worldographer, CC-BY 2021 Brian C. Rideout (6mi / hex) |
The Tower of Sezerkhan - A sunken evil Wizard's tower filled with lost lore both of Sunken Tula and lost Dwarf strongholds.
Bees! - Giant bees nest in black pines and feed off the flowering dry hillock.
The Mushroom Waste - A forest of giant mushrooms filled with Fey, myconids, and magic ruins. Not to mention lots of drugs & poison.
The Bronze Mushrooms - ancient minarets of a Tuloise Palace that blend in with the giant mushrooms. Massive Serpentmen-infested dungeon Beneath.
The Bleakwood - A forest of swampy black pines filled with strange Fey.
Logsunna's Tree - Home tree of a corrupted dryad that serves as the cat's paw for a witch.
Battlefrogs - A wet marsh where Fey beings ride giant frogs into battle with a tribe of trolls. My son's contribution.
Jacdau's Hut - A hag-like Fey creature that can talk to ravens serves as an oracle here.
The Garden of Stone Elves - A set of monuments to elven heroes of Sunken Tula mark where a cemetery is buried. A vampire sleeps here.
The Medusa's Garden - Easily mistaken via gossip for another Garden of the Stone Elves, it is a place where many elf heroes fell to a Medusa here.
Palace of the Blue Princess - A sunken mansion that serves as the home to a Nixie that is Queen of the Serlie Fae of the marsh.
The Perfectly Ordinary House - An enchanted house so blessed that it has remained untouched by time. It is a perfectly preserved Tuloise manner attended by Unseen servants. Those who have found it assume it is haunted. It is actually the safest place in the marsh.
The Forsaken Tower - A tower that was the highest point in Ancient Tula. It did not sink when the rest of the nation did. Horrors committed by the desperate refugees within have left it haunted.
The Round Hill - This Tuloise library was protected by a gargantuan resilient sphere by the sage who served as its head librarian. Years of mud and sediment have formed a stony shell around it. In a near-perfect hemisphere.
The Godbreaker Temple - A monument to the state religion that replaced the faith in God's in Tula: site of the incineration of hundreds of relics.
A Monument to Our Folly - A statue attended by a bound Tuloise magus who cannot die until the godbreaker temple falls.
Redwater - A bog rich in Iron to the point of being toxic to the Fey. Home of the bogfolk.
The Godstone - A remaining asteroid from the barrage the gods used to crush Tula. Radiates wild magic. Worshiped by the bogfolk.
Lair of the Blue Prince - Cavernous underground ruin that serves as the lair for a giant mutant crocodile.
Ithiril- An elven village hidden by illusions, populated by elves trying to uncover the tragedy of the Tuloise.
The Behemoth - A castle-sized conch shell in the middle of the reefs. A magical labyrinth inside houses a prophetic water weird.
Sunken Ship Graveyard - A trench where wrecked ships are naturally swept, including hundreds of ancient Tuloise wrecks. Caked in poisonous coral.
Tomb of the First King - The ruins of a lost ancient Dwarven stronghold.
Hidden Mithril Mine - A magically concealed Dwarven Mithril mine guarded by an ancient dragon. Lost for 4,000 years.
Tower of Brea - Formerly the Northernmost outpost of Telantha, now a garrison that watches the road to Maraisberg. A new inn has recently been established by the roadside at its base, offering travelers a break midway through the two - week journey to Maraisberg.
I have also marked the position of a number of teleportation circles that a knowledge Magic-User can activate to jump across the across the marsh. Only the elves of Ithiril know of them.
I planned these out over the course of two hours of brainstorming with a notebook and the mapping program.
Looming Threats
I am using my devastation dice to plan impending threats to the setting.
Vampire Plague
Fianna the Tomb Raider will become infected with vampirism through an ancient crypt and then turn a number of notable NPCs from the hall of heroes.
Trigger: Fianna is rescued from Logsunna and Eleni and returned to Maraisberg.
- D8: Fianna disappears when traveling to the Garden of Stone Elves
- D6: Several disappearances raise the alarm in town.
- D6: Several vampire spawn attack the PCs hoping to drawn them into the clan.
- D4: Fianna dominates the Countess or successor and takes control
- D3: Fianna creates an army of the undead to choke the road and isolate her new slaves.
The Countess Dies
Countess Adelane is 77 years old and her health is failing. If she cannot appoint an aid, the city will be handed out to the king's corrupt brother.
Trigger: Start of Campaign
- D8: Countess falls down during public address.
- D8: The Countess attempts to marry Dr. Rem so she can appoint his grandson heir. Assassins attempt to sabotage the wedding.
- D6: if the wedding is not saved, the Countess dies heirless and Maraisberg passes on to Prince Baldric.
- D4: Baldric's misrule leads to conflict between Dwarves and humans.
- D4: Dwarves & Halflings emigrate en masse, paralyzing the economy.
Eleni Opens the Doorway to Hell
In her bid to raise her dead love, Vand, from the grave, Eleni will stop at nothing, even if it means making bargains with the Lords of Hell.
Trigger: Eleni is thwarted in the Tower of Sezerkhan
- D8: Eleni avenges herself on the PCs with a swarm of imps disrupting their adventures.
- D6: Eleni breaches the Round Hill and bests the Librarian.
- D4: Eleni raids the palace of the Blue Princess with lesser fiends and aquatic Unseelie Fey.
- D4 Eleni sacrifices the Blue Princess in the God breaker Temple and raises Vand.
- D3: Fiends unleashed by Eleni"s rite ravage the countryside.
- D3: Eleni is slain by Vand, but he cannot close the gates.
The Gentlemen Cause War w/ The Fey
This faction of criminals from Telantha is trading in Fey slaves and flesh. They are at risk of infuriating the Unseelie of the Marsh.
- D6: The Gentlemen target the PCs by dropping hints of their lair and setting up an ambush.
- D6: The Gentlemen & The Amber Order go to war, leading to a bloodbath in the House of the Blue Roof
- D4 : A Sidhe freed by the PCs, but wounded by the Gentlemen flees the Elven Grove, swears vengeance, and raises an army of Unseelie Fey.
- D4: Murders and disappearances Pick up on the verges of the town.
- D3: A night of Chaos and bloodshed devastates the town on the next full moon.
The Serpentmen Return
The Ushak once were the ruling caste of Tula, and their memory has all but been erased from history. The plundering of their Tombs risks Awakening them. Once awakened they will claim thralls and seek to use Maraisberg as a staging area for enslaving Telantha.
Trigger: Any one other front is concluded.
- D8: A Tomb is opened by accident by a low-level adventuring party; They are captured and interrogated, then left on a hideous state as Alchemical zombies.
- D8: A cult of Serpent men are awakened beneath the Bronze Mushrooms.
- D6: The Elves of Ithiril are invaded by Serpentmen and their automata.
- D6: The Elves of Ithiril show the Serpent men their underwater portal near Maraisberg, and the Serpentmen are forced to enslave a few fishermen to hide it.
- D4: Giant Automata rise from the lake and attack Maraisberg.
- D3: Dwarf slaves are taken to the swamp to dredge out an Serpentman Time Arc.
- D6: The invasion begins...
Obviously, I still need to flesh out some NPCs and create a random encounter table for several regions of the marsh, but it is more than enough to get a good campaign going.
The First Session
So once I had this worked out (which took me about four hours total planning while tuning out kids' cartoons or burning some of the Midnight Oil) I was able to work in lots of details.
The first adventure was a search and rescue mission to find another group of adventurers who went missing on an expedition to Sezerkhan's Tower. Knowledge beamed into the towers' initial discoverer's head led them to believe that this is one of the homes of an evil Immortal who preyed on the Dwarves of the Tuloise era, thus it might contain hints to the last location of The Tomb of the First King.
The PCs needed to search the Mushroom Wastes to find the missing PCs including Fianna, who may, if her fate remains unchanged, precipitate a Vampire Plague.
The first set encounter on-route was a chance to rescue some faeries from Bogfolk who had kidnapped them for black market trade to the Gentlemen, a hook that they had immediate interest in. While communicating with the rescued faeries, they heard names of The Blue Princess and Jackdau, but no details. They were warned about the pale witch Eleni and her minion the rogue Dryad Logsunna, who has served her ever since the corruption of Logsunna's tree. They were told that Fianna and her companions were pixie-led by Logsunna. An off hand mention of The Garden of Stone Elves was also made.
On their way to the Mushroom Waste, they spot a few giant Bees! in the distance.
The PCs confronted Logsunna, and in the process, they hear her mention both Jacdau and the Bronze Mushrooms. Rather than confront her physically, the PCs engage in a social game of cat-and-mouse, being sure to follow the folkloric rules of dealing with faeries (don't give or ask for names, never thank them, do not accept food offered, etc.) which ended in them tricking Logsunna into giving up her prisoners.
Th next morning, they attempted to enter the Tower of Sezerkhan and were blocked by Logsunna, who was compelled by magic to prevent them from interrupting Eleni's ritual. They manage to ask her an inciteful question that forces her to see that her service to Eleni is self-destructive, precipitating a fresh and successful save against the magical binding.
Logsunna goes berserk, turning into a crazed fey monster, slaughters Eleni's other bondlings, breaks Eleni's summoning ritual and forces her to disable Logsunna before confronting the party. A lucky spell knocked Eleni unconscious, letting them free Logsunna and leaving Eleni to her mercy. Logsunna chose to take her captive in hopes of forcing her to explain how to unbind them.
The Method to My Madness
In this first session, my players have heard rumors of none new locations, three factions, and met NPCs who were their gateway into three of the Looming Dangers I have designed. The players came away knowing that there was a lot to see and explore. They had furiously scribbled down names, clues, and initial rumors.
This left them feeling curious. They had tons of questions that they want answered; to put meaning to the names and places. And that has made them thirsty for more of the game as we go. They have bought in, and as long as I keep teasing secrets, and make sure each answer comes with a new question for the first little while, I should be able to keep them going.
Tangentially related. I don't really think in 'rooms' so much as 'scenes'. I write novels, so that's probably why.
ReplyDeleteOne thing I'm working on is die dropping small dungeons. Tossing down a bunch of differently colored d6's, with each color representing a room type, and the number representing the specifics. So, green for challenge room, yellow for treasure/trap, red for combat encounter, etc...draw rectangles or circles around the dice, list what's in there from your chart, roll up some room dressing if you want, connect nearby rooms/scenes with lines, lock/block/hide a few doors, maybe list a theme appropriate wondering encounter, and there you go.
You get a dungeon a bit like the original Rogue. I used to program roguelikes many moons ago, which is where I get the idea.
That way, if I have NOTHING I can roll up a little group of scenes, that look much like those flow charts from XDM. It's a bit too random to be super interesting, but you can quickly put together the bones of a mystery dungeon.
Example Chart I whipped up, a greenskin cave lair:
Red: Mobs
1. 2d6 Goblins playing cards.
2. Same, guarding a bunch of starving human prisoners.
...
Green: Environmental/Cave.
1. Raging underground river.
2. Narrow passage. Armor will squeak (roll for 'noise', ie roll the encounter die)
3. Cliff to climb, 15 feet.
4. Slippery moss.
5. Sulfuric acid pool. 1-3: Bubbling, 4-5: Still, looks clear, like water, 6: Geyser!
6. Ye old 10 foot chasm and rope bridge.
White: Entrance
1-3. 2 sleepy goblin guards.
4-5. with dire wolves.
6. Chained up owlbear.
Blue: Boss
1-3: Ogre with 2 hobgoblin guards and 2d6 goblin buddies. Small chest/treasure.
4-6: Same, but large chest!
You can get a couple of quick exploration jaunts just from that before replacing some things, adding a few. I've not gotten to use it yet, my players haven't gotten too curious on the road yet, but I think it'll work.
This is so cool! Thank you for sharing it with me.
DeleteThis comment has been removed by a blog administrator.
ReplyDeleteThis is great stuff - strongly aligns with what I do, salting the local environment with hooks and then following where the players lead. Kudos for the map-work, I usually just sketch out something by hand in a hurry, great to have something like that to hand out and let the players fill in.
ReplyDeleteI have only recently started trying to formalize the plots in the background in the clear stages of progression like you have hear, to date it has been 'faction X has goal Y' and I've had them improvise their actions according to local news at the time. Makes more sense to plan out what they would do undisturbed like what you have written along with dice-shifts, must try it out.